In my last post, I talked about VPNs and their overall utility, but for those of you that want to try a fun project that will enable you to create and host your own VPN for free, then stay tuned!
Getting Started:
First things first, in order to setup a VPN in the cloud, you must find a cloud provider that suits your needs. Cloud computing can range from cheap to expensive and a lot of factors contribute to its cost, such as the service being used, resource allocation for the server itself, load and bandwidth requirements, etc. Thus, if you are to find a service that is completely free, you need to look into the “always free ” tier plans that several companies provide. The top dogs, such as Amazon AWS and Google Cloud, provide free tier options that may be appealing to most, and they are well-established companies offering an abundance of cloud services. If you are willing to get into the nitty gritty of cloud hosting further down the line, they might be a viable option.
However, for the sake of demonstration and saving costs, Oracle Cloud has an always free tier that is perfect for a simple, free VPN for a variety of reasons: they allow for large outbound data transfer at 10 TB/month, they have a pre-configured image of Ubuntu running OpenVPN Access Server which will be our VPN software of choice here, and they have server locations across the world, any of which you can select as your dedicated VPS. Their particular OpenVPN image allows for two clients to be connected simultaneously for free, but you can still have several clients logged into the same VPN server or user if you so desire.
One caveat of Oracle is that you are locked into whatever server you select initially. Other paid VPN providers allow you to choose which servers you want on the fly, but in this case, you only get the one. Therefore, pick the server you will want to stick with from the get-go. If you are trying to bypass region-locked content in your own country, for instance, try picking a server where you know you can freely consume said content. As I mentioned, this demo will be using OpenVPN, an open source VPN software that has downloadable apps for Windows, Android, IOS, and Linux clients that will allow you to connect to your VPN. I will run through each step in the process so you can get your VPN server up and running in no time!
Creating a VPS with OpenVPN Installed:
Now that you have an understanding on what will be required to setup the server, head on over to Oracle Cloud’s free tier signup page. Create an account and select the region you wish to host your VPS. As aforementioned, you can choose a country more prudent towards your region-locked needs, or you can simply select the closest server to your geographical location, which may also boost overall performance. Once finished, allow a few minutes for your account to finish preparing before you proceed.
The image for OpenVPN can be found under Oracle’s Cloud Marketplace. Just login to your account and select “Get App”. Choose “Commercial Market” on the next screen and then “Sign In”. Lastly, ensure you have the Oracle terms of use box checked before selecting “Launch Instance” on the next page. You will then be greeted by the instance creation page for your server. Feel free to use any unique name you want for your instance. I’ll use “OpenVPNDemo” for the time being. By default, OpenVPN will be setup in the “root” compartment. You can always change your compartment settings later if you wish to organize any other instances you might have.

Creating SSH Keys:
Now you can setup your SSH keys. For those unaware, Secure Shell (SSH) is a means for you to securely access the file system and settings for your server so you can configure the initial settings. The connection is encrypted, so don’t worry about prying eyes seeing the information you are typing. To secure SSH access, we will need a public/private key pair. Oracle has an option to generate one, but I prefer to use PuTTY, a free terminal emulator that allows you to SSH directly to your server. Go ahead and install it on your device. One feature PuTTY has available upon installation is PuTTYgen which will help us generate our key pair. If you are on Windows, simply type “PuTTYgen” into the taskbar’s search function and select the application when it appears. Click “Generate” and feel free to wiggle your cursor in the blank area to add randomness to the key that is created.
Once that is done, you can either copy the public key displayed manually or click the “Save public key” button to save a file containing that key. In my case, I copied the public key and pasted it into Oracle’s SSH key box. Remember to select the “Paste public keys” option if you do it this way. Now you can finalize the OpenVPN instance by selecting “Create” down below, leaving any other options as default. Once that is done, go back to PuTTYgen and select “Save private key” and choose a location on your device to keep it safe. You will need it later in this tutorial. You may also password protect the key to add an additional layer of protection should someone nefarious gain access to your key.

Firewall Rule Configuration:
While Oracle is allocating resources and launching your instance, take this time to edit the default firewall rules. Look under “Instance details” for “Virtual cloud network”. Click the link that starts with “vcn”. Then select the subnets link in the center of the screen under your “subnets” list (should be the only subnet present) and then click the default security list link under your “security lists” page. You may have some rules present by default, such as a couple for ICMP or a port 22 rule for SSH. If these are present, leave them be. Otherwise, you should add a port 22 ingress rule at the minimum which will allow you to SSH into your server. In addition to that, you will also add rules for TCP ports 443, 943, and UDP port 1194. Port 943 is the default port your access server will be listening on for your admin panel. Port 443 is for TLS connections and is a fallback option OpenVPN uses should the default VPN port of 1194 be blocked for any reason. As such, port 1194 is the port assigned by IANA to OpenVPN for UDP VPN connections and will be used instead of port 443 whenever possible. Our rules should look as follows:

Here is some further explanation on how to create each rule.
To add a rule for ports 22, 443, and 943, (you can ignore adding port 22 if it is present by default), select “Add Ingress Rules” and make the following changes:
Source CIDR : 0.0.0.0/0
IP Protocol: TCP
Destination Port Range: 22,443,943
Meanwhile, the rule for port 1194 will be different since it utilizes UDP, so you will also create another rule with the following parameters:
Source CIDR : 0.0.0.0/0
IP Protocol: UDP
Destination Port Range: 1194
An example of what the rules should look like for ports 22,443,943, and 1194 are shown below:
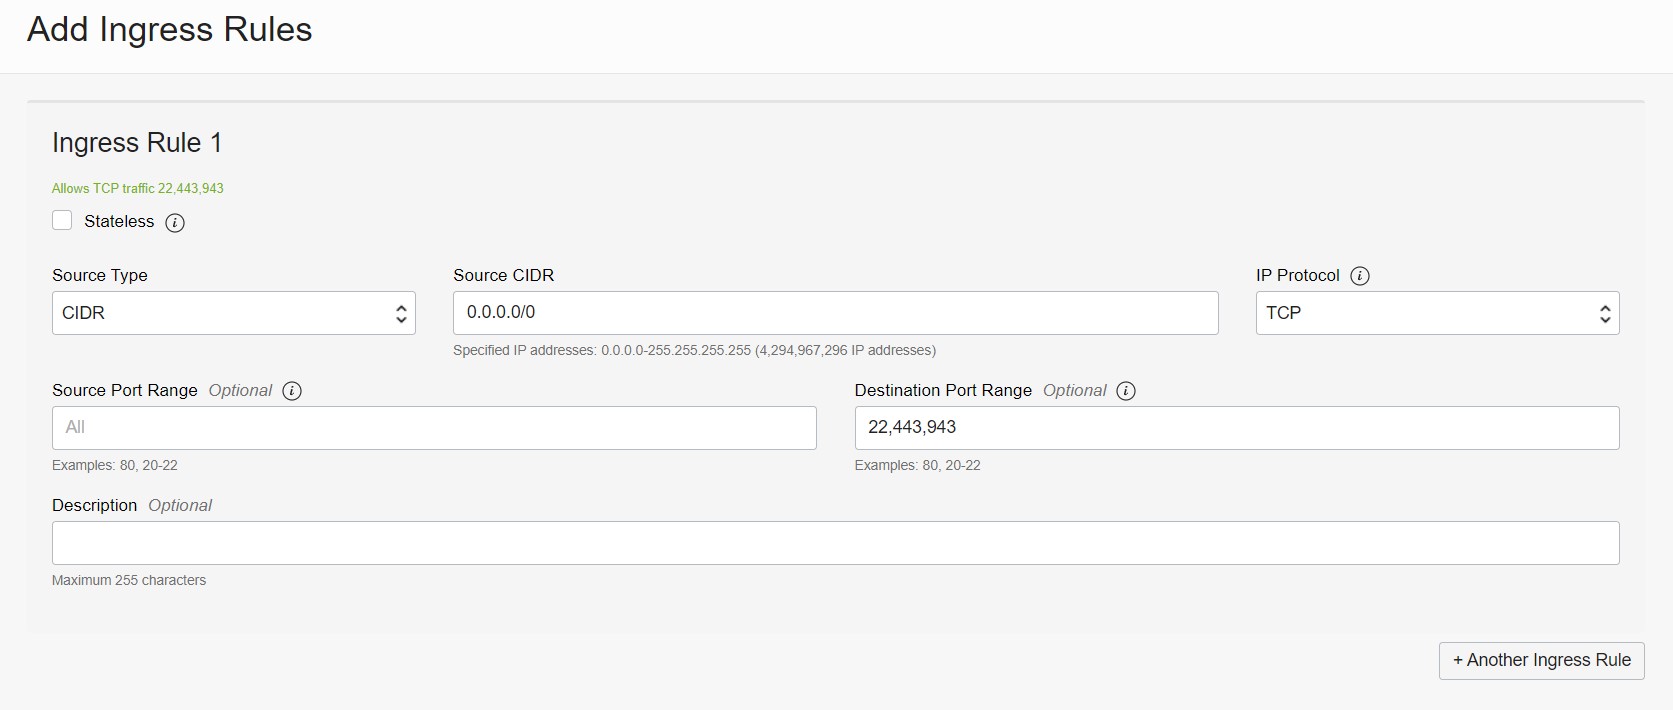
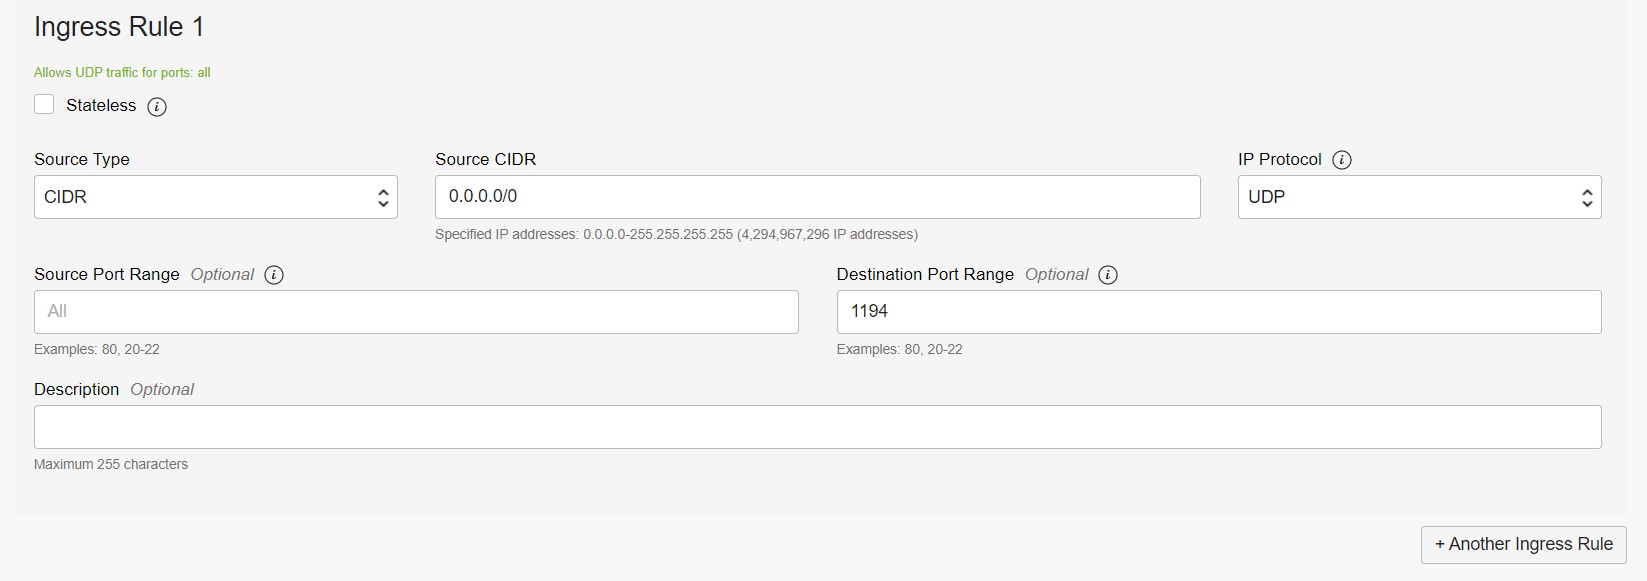
When in doubt, the first firewall image above shows a summary of what every rule should look like.
Connecting to Your OpenVPN Access Server:
By now, the instance should be running. Select the three lines in the top left of your browser next to Oracle’s logo and choose “Compute/Instances”. Click on the name of your running OpenVPN instance and its information should then be displayed on your screen. Under “Instance access”, there should be a public IP address listed. Go ahead and copy it. Open PuTTY that we installed earlier (not PuTTYgen) and paste the address you just copied into the “Host Name” bar. The default username for the OpenVPN Access Server image is “openvpnas”. In order to SSH using your public IP, you will need to append “openvpnas@” to the beginning of the address similar to this example shown:
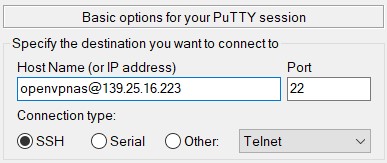
You can name the session whatever you would like under “Saved Sessions” and click “Save” once you are done. This will enable to you launch another SSH session easily should you need to in the future. Next, under the “Category” column on the left, select “SSH” and then “Auth”. Hit the “Browse” button on the right and search for the private SSH key you saved earlier.
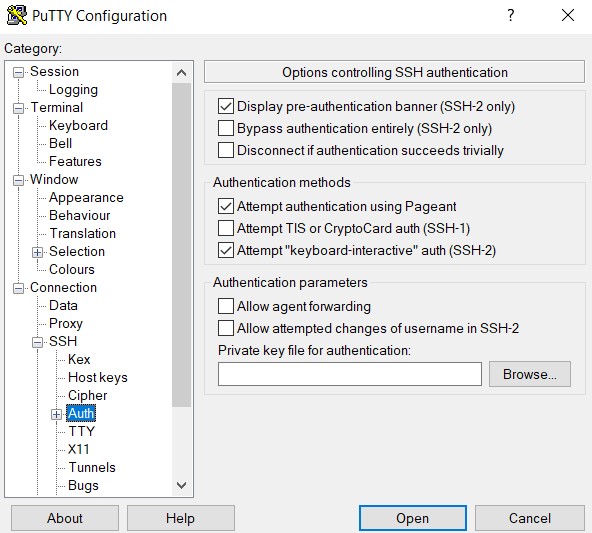
Go back to the previous screen by selecting “Session” at the top of the “Category” column. Click “Save” once again now that you added the private key for authentication and then select “Open” to start the SSH session. Once greeted by the OpenVPN SSH session, type “yes” to agree to the terms. You will be asked a series of questions afterwards, but all of them should be set to default, so simply hit the enter key for every one of them, even when asked to input an activation key (unnecessary since our instance is free).
Once done, open a web browser and type the following into your address bar, replacing the IP address shown with your public IP from earlier:

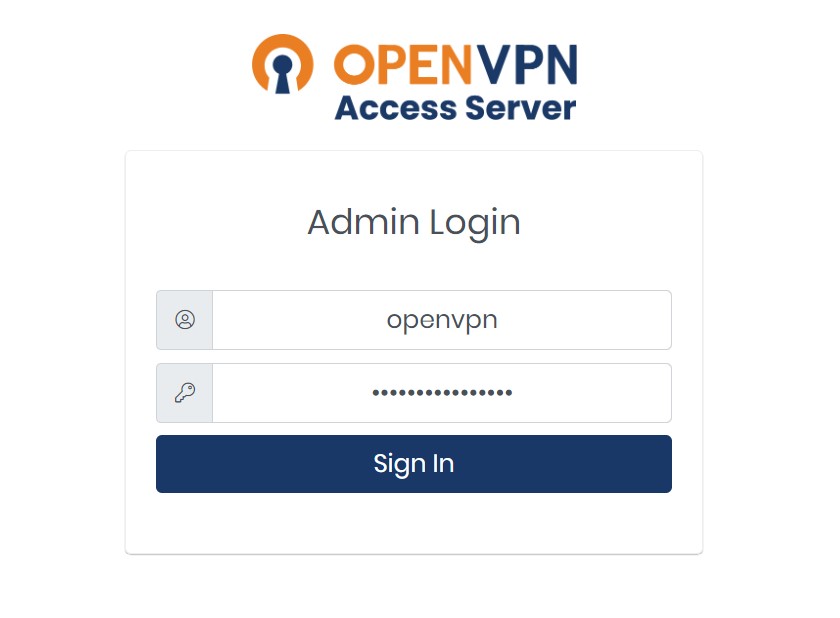
The Web GUI for OpenVPN will display. If a certificate warning pops up first, simply continue to the webpage and ignore the message. To change the password for the admin user, open your SSH terminal and type “sudo passwd openvpn”. Type your new, secure password twice to confirm, hitting enter after each entry. Return to your web browser and input the password with the username “openvpn”. Agree to the terms and policies.
Configuring the VPN Server:
Once in the admin interface, you now can go to the user settings and add profiles that will use your VPN connection. I recommend creating a second admin account so you can disable the default “openvpn” account later. This will provide added security to your admin account as no one will know the username you create for your primary admin. Under “User Management”, go to “User Permissions”. Type the name of a new user and click “More Settings” to create a password. Check the “admin” and “auto-login” boxes. An example “NewUser” is shown below. This will be our new admin account.
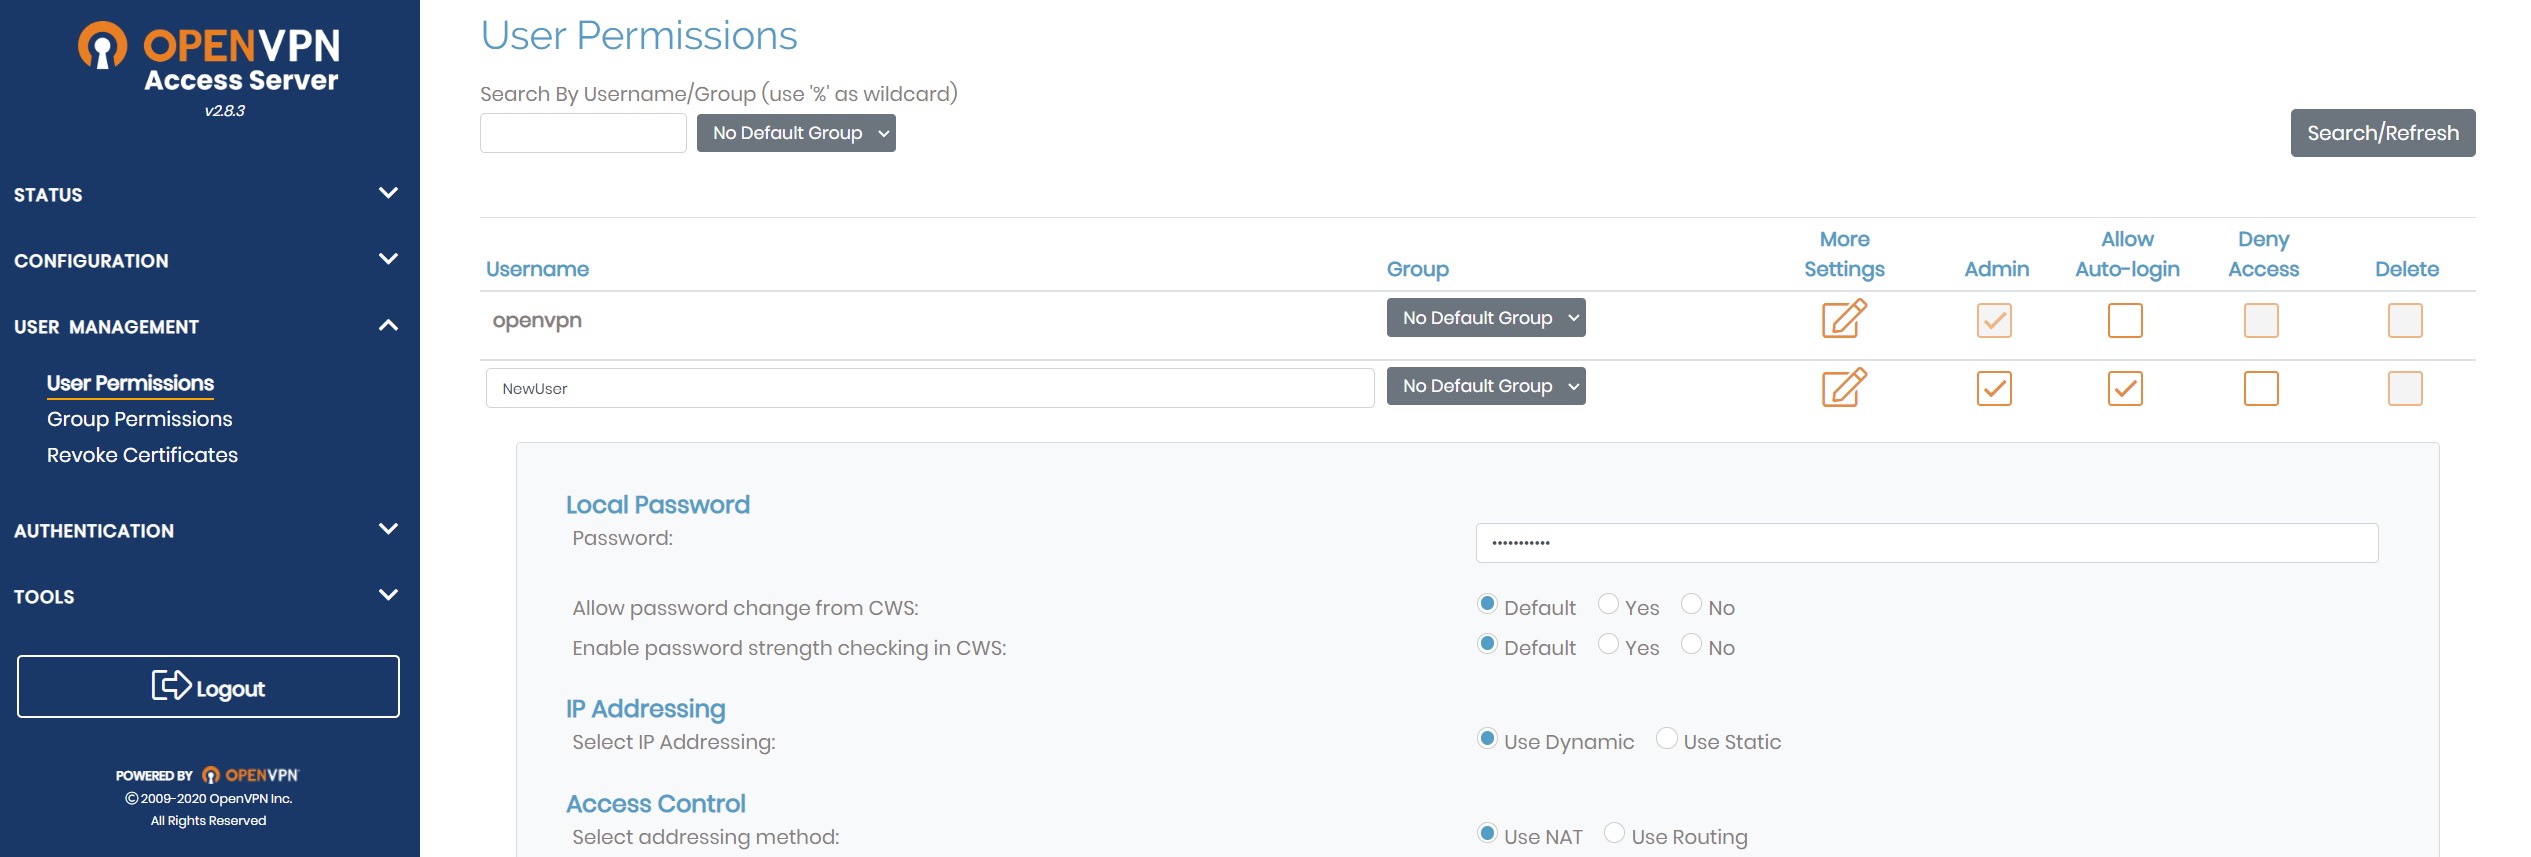
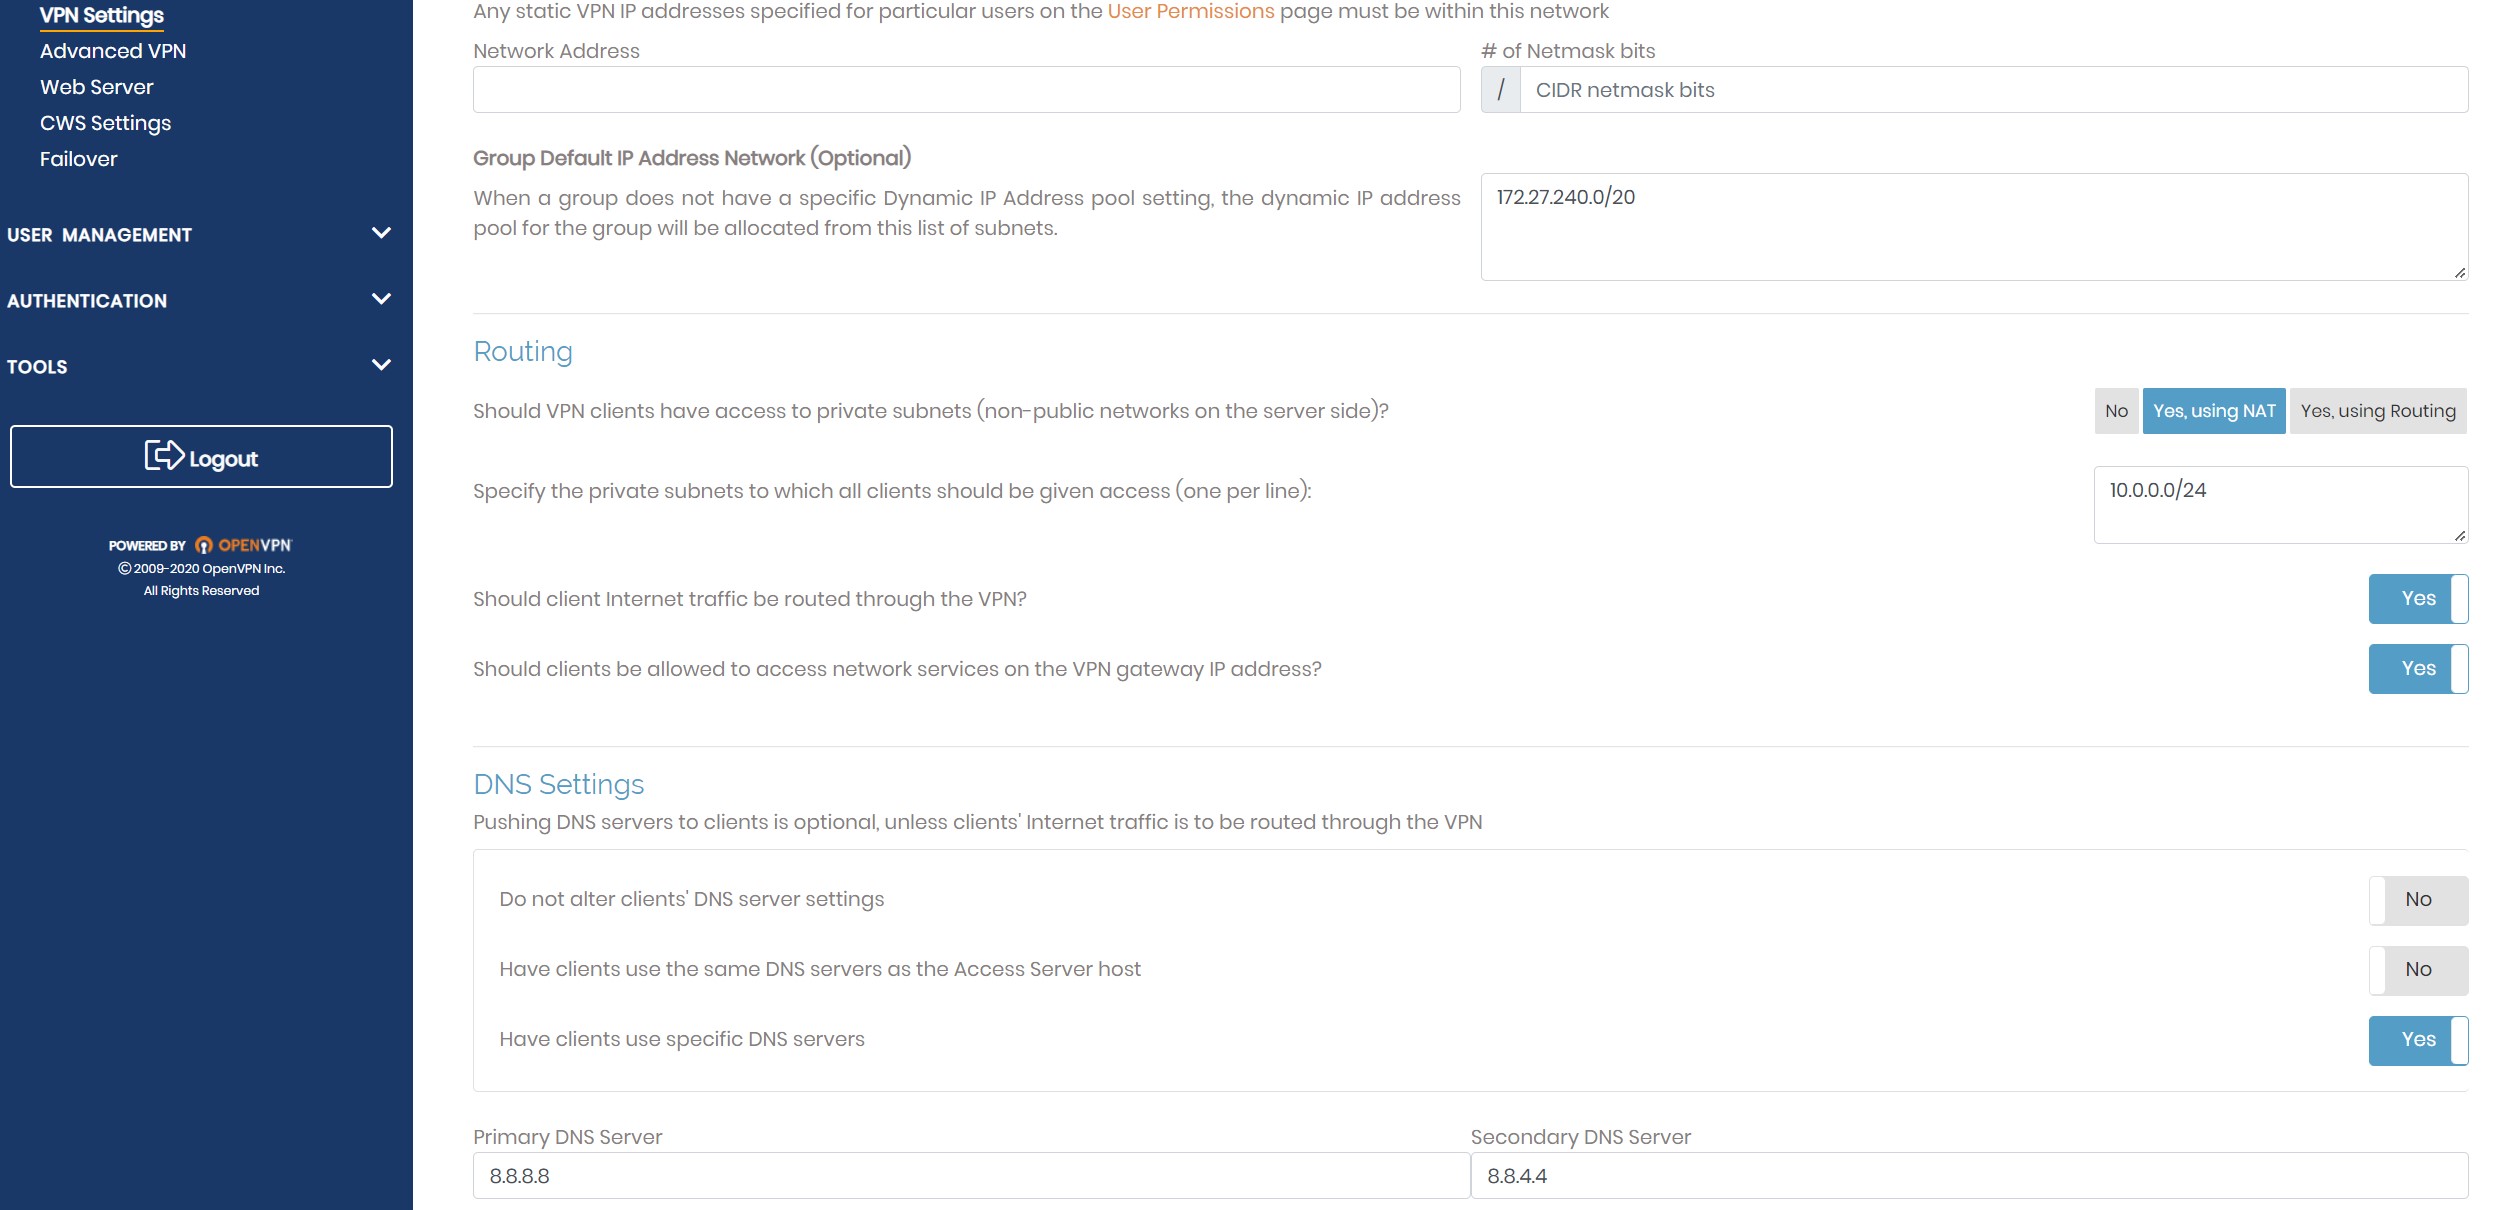
Scroll to the bottom and click “Save Settings”. Click the “Update Running Server” button that appears. You can continue to add other VPN users, just remember to avoid checking the admin box unless you want several admin users. Also, recall that only two people can be connected to the VPN service at any time. Now go to the “Configuration” tab on the left and click “VPN Settings”. Scroll down to the DNS settings. Here you can configure any DNS server you want to receive your clients’ DNS requests while you are connected via a VPN. I recommend one of the common public DNS servers like CloudFlare or Google, but you can also leave it at the default settings. If you want to manually change the servers, select “Have clients use specific DNS servers” and input the primary and secondary servers of your choice. In the screenshot below, I use Google’s servers as an example.
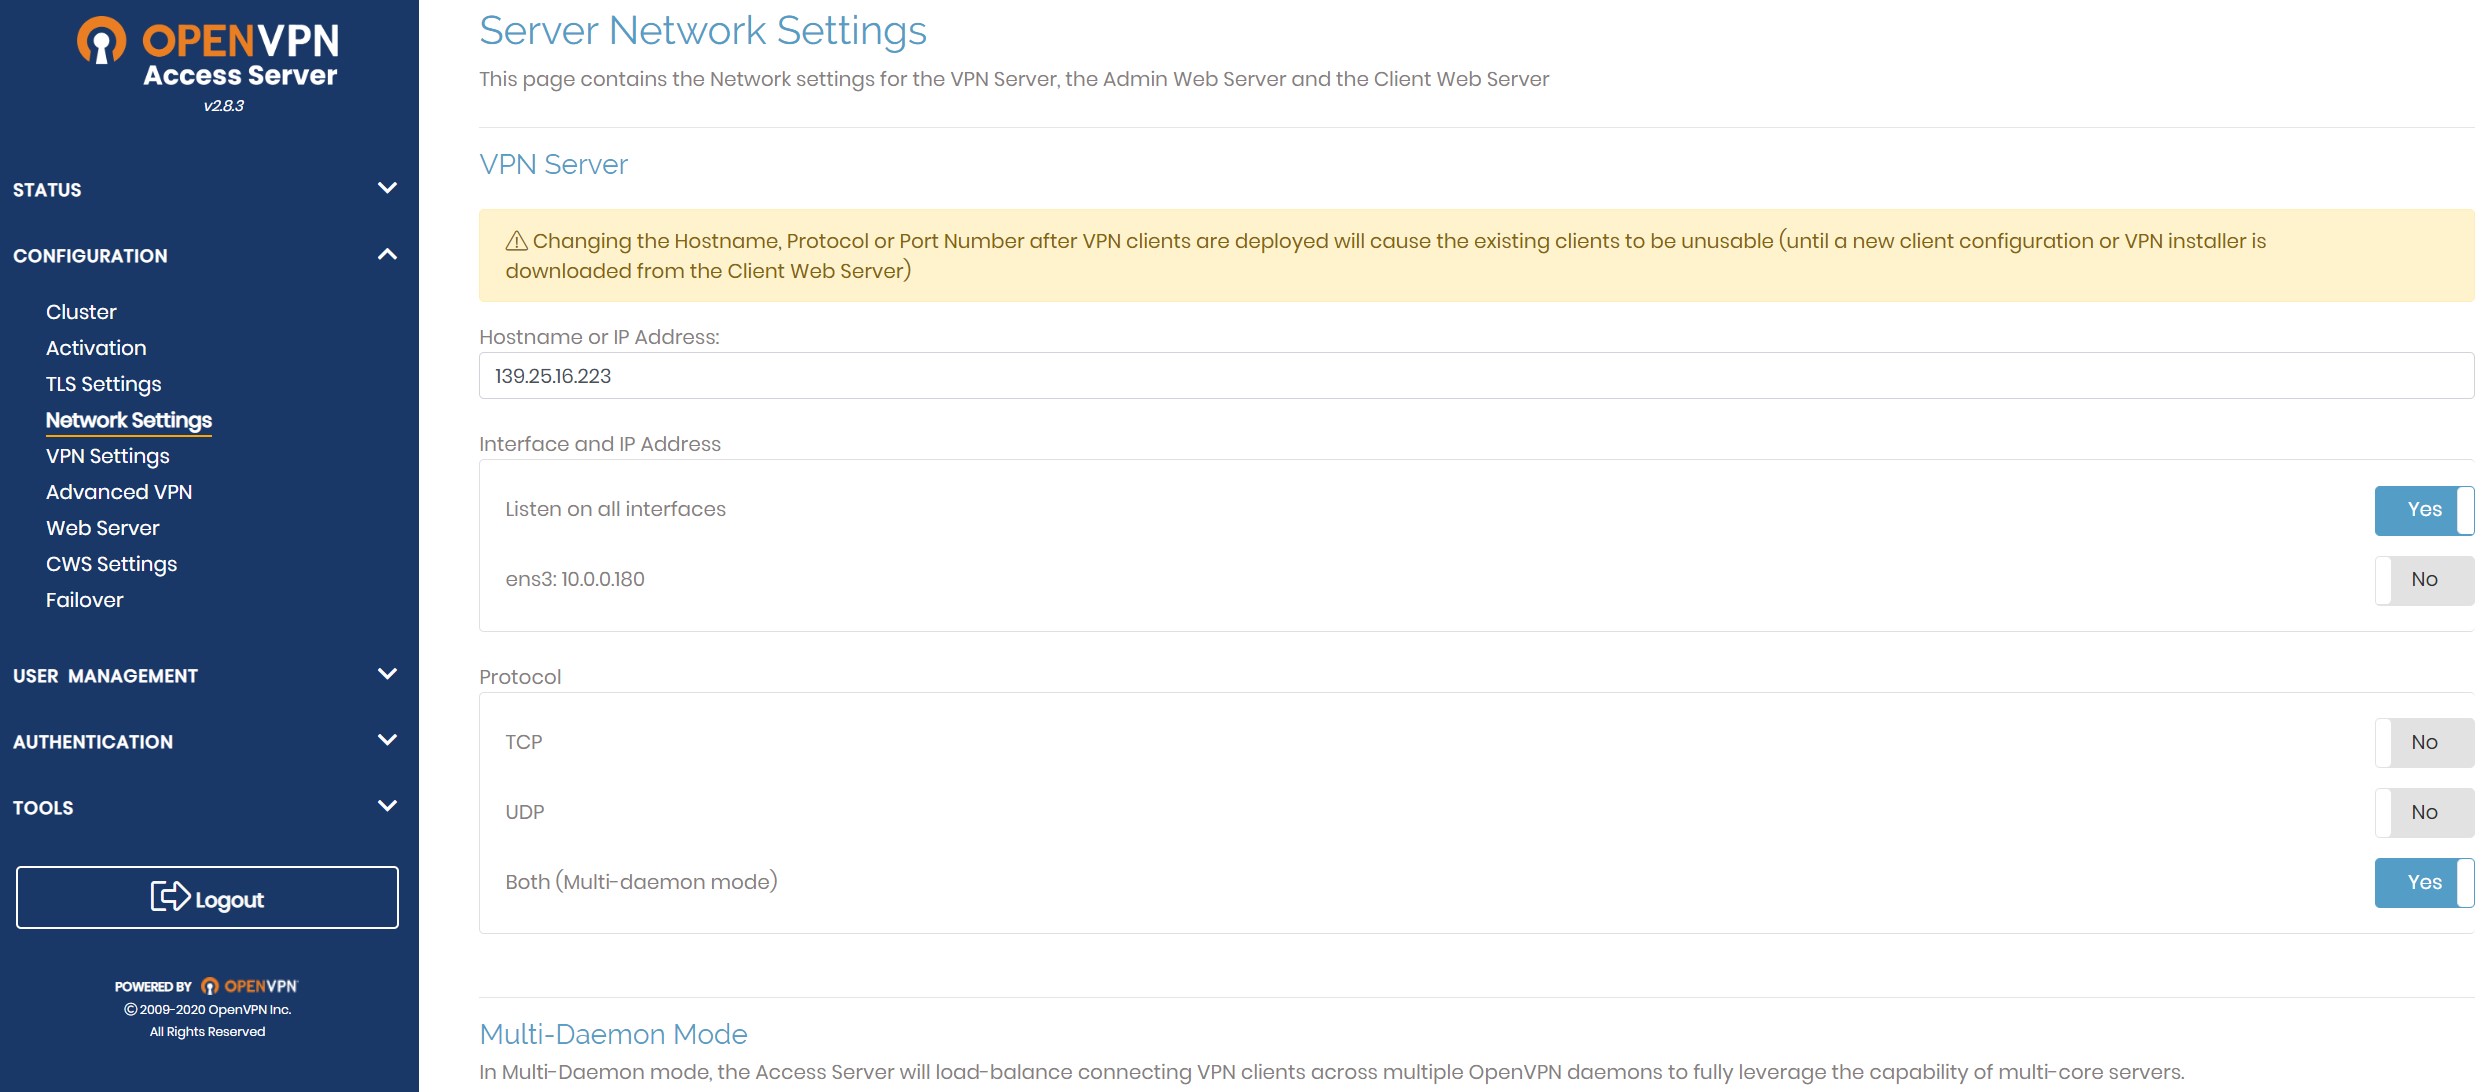
Last setting you should modify before starting to connect clients is the hostname for the server. By default, the setting does not consider your public IP. To change this, go to “Network Settings” located directly above the “VPN Settings” under “Configuration”. Type your server’s public IP in the “Hostname or IP Address” box, scroll down, hit “Save Settings”, and click “Update Running Server”.
Adding VPN Clients:
As far as mandatory configuration goes, we are ready to connect some clients to the VPN! For this demo, I will show how to connect a PC running Windows to the server you just created. You can go to openvpn.net to get started. Simply click this link if you would like to download the client for Windows as well. Once downloaded, click through the welcome messages, hit “Agree”, etc. You will be prompted to input the IP or hostname for your server. Do so, then click “Next” followed by your user’s information and password.

You may check the “import auto-login profile” and “connect after import” options as well. There will be a prompt asking you to accept or deny a certificate. This certificate is what establishes a TLS connection to facilitate the VPN connection between your client and server, so you want to make sure you hit “accept”.
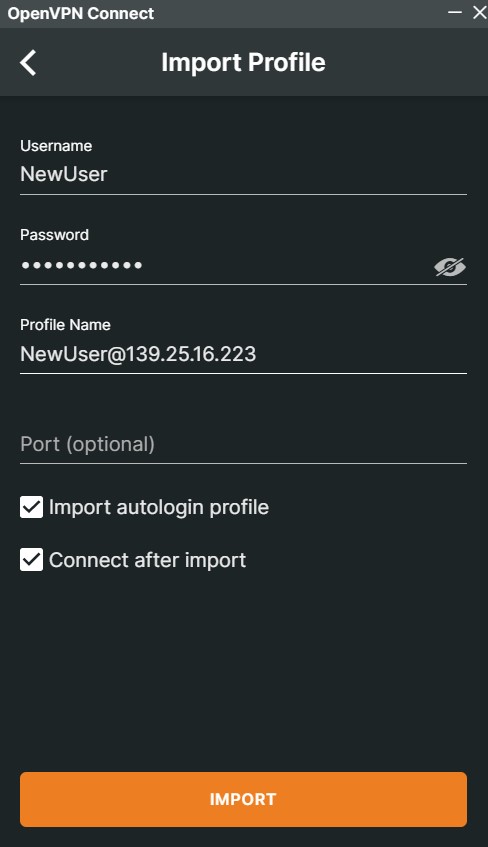
If you have difficulty getting the URL to work, you can also import your profile directly into the client by downloading it from the OpenVPN server and adding it to the “File” tab on your client. Simply go to the same URL as your access server, but remove “/admin” from the end and login. There will be an option to download your user’s profile on the screen. You can upload it into the OpenVPN client afterwards.
Upon hitting “import”, your VPN should be connected! Verify this by going to Google and typing “what is my ip” into the search bar. The resulting IP should be that of your VPS in Oracle Cloud.
Congratulations, you now how a personal VPN setup that you can access anytime, anywhere, for free! Now, there are a few optional steps you can take to secure your account further and harden your system, which I will include down below.
System Hardening Tips:
Disable the OpenVPN Admin Account and Add a Sudo Password
I previously had you create an admin account with its own username and password. This was preparation to disable the bootstrap openvpn user. Since “openvpn” is the default username, anyone and everyone knows this and dishonest people can use this knowledge to their advantage. In short, the username is compromised. Moreover, there is no sudo password present by default when you access the server via SSH. Thus, I highly advise you to disable the openvpn admin account only after you created another user with admin privileges, and then add a password to the openvpnas SSH user. To do so, I have a video courtesy of OpenVPN that explains how to implement these changes along with a few other helpful tips. Click here to check it out.
Use a Hostname Instead of an IP Address
One extra step you can take is to use a hostname in place of your server’s IP address. A free way to achieve this is through a service called DuckDNS, which can also be used to monitor any changes to your server’s public IP address. As far as I am aware, Oracle Cloud tends to statically assign IPs until you release them (i.e. you delete your instance or manually change the server’s IP address). That said, the utility dynamic DNS services like DuckDNS can provide may be useful if you want your server to remain highly available in the event an address change does occur. Just sign in, input your cloud instance IP address with a domain name, and follow their instructions to insert your unique token within the access server. You can also change the hostname from your address to the domain name you recently added to PuTTY and within the network settings on your VPN server if you’d like.
Enable MFA
Under the server’s general settings, you can enable multifactor authentication which forces all users to also use an authenticator app when logging in with the exception of the openvpn user (won’t matter if you disabled the account already). If you have problems or lose the phone/device containing the authentication token, you can reset MFA through SSH for a specified user. For example, those with the Google Authenticator app can renew their token with the following CLI entries:
cd /usr/local/openvpn_as/scripts/
sudo ./sacli –user USERNAME GoogleAuthRegen
The first line changes your directory to “scripts”, and the second resets the MFA. Just replace USERNAME with the actual account name you are trying to reset.
Change the Default Admin Port
A not-as-effective but still useful way to protect your server is by changing the default listening port for the admin panel. 943 is the current default port, but you can change this to any unused port. The catch is that you now have to create another rule for the TCP port under your default Oracle Cloud firewall settings. You also have to use that port in the URL bar when trying to connect to your server’s GUI. For instance, if we use the port 10443, my web address would look something like:

I would also make sure “Web Service forwarding settings” are off and the port number is input under “Admin Web Server” under your server’s “Network Wettings” in the “Configuration” tab. An example is shown below:
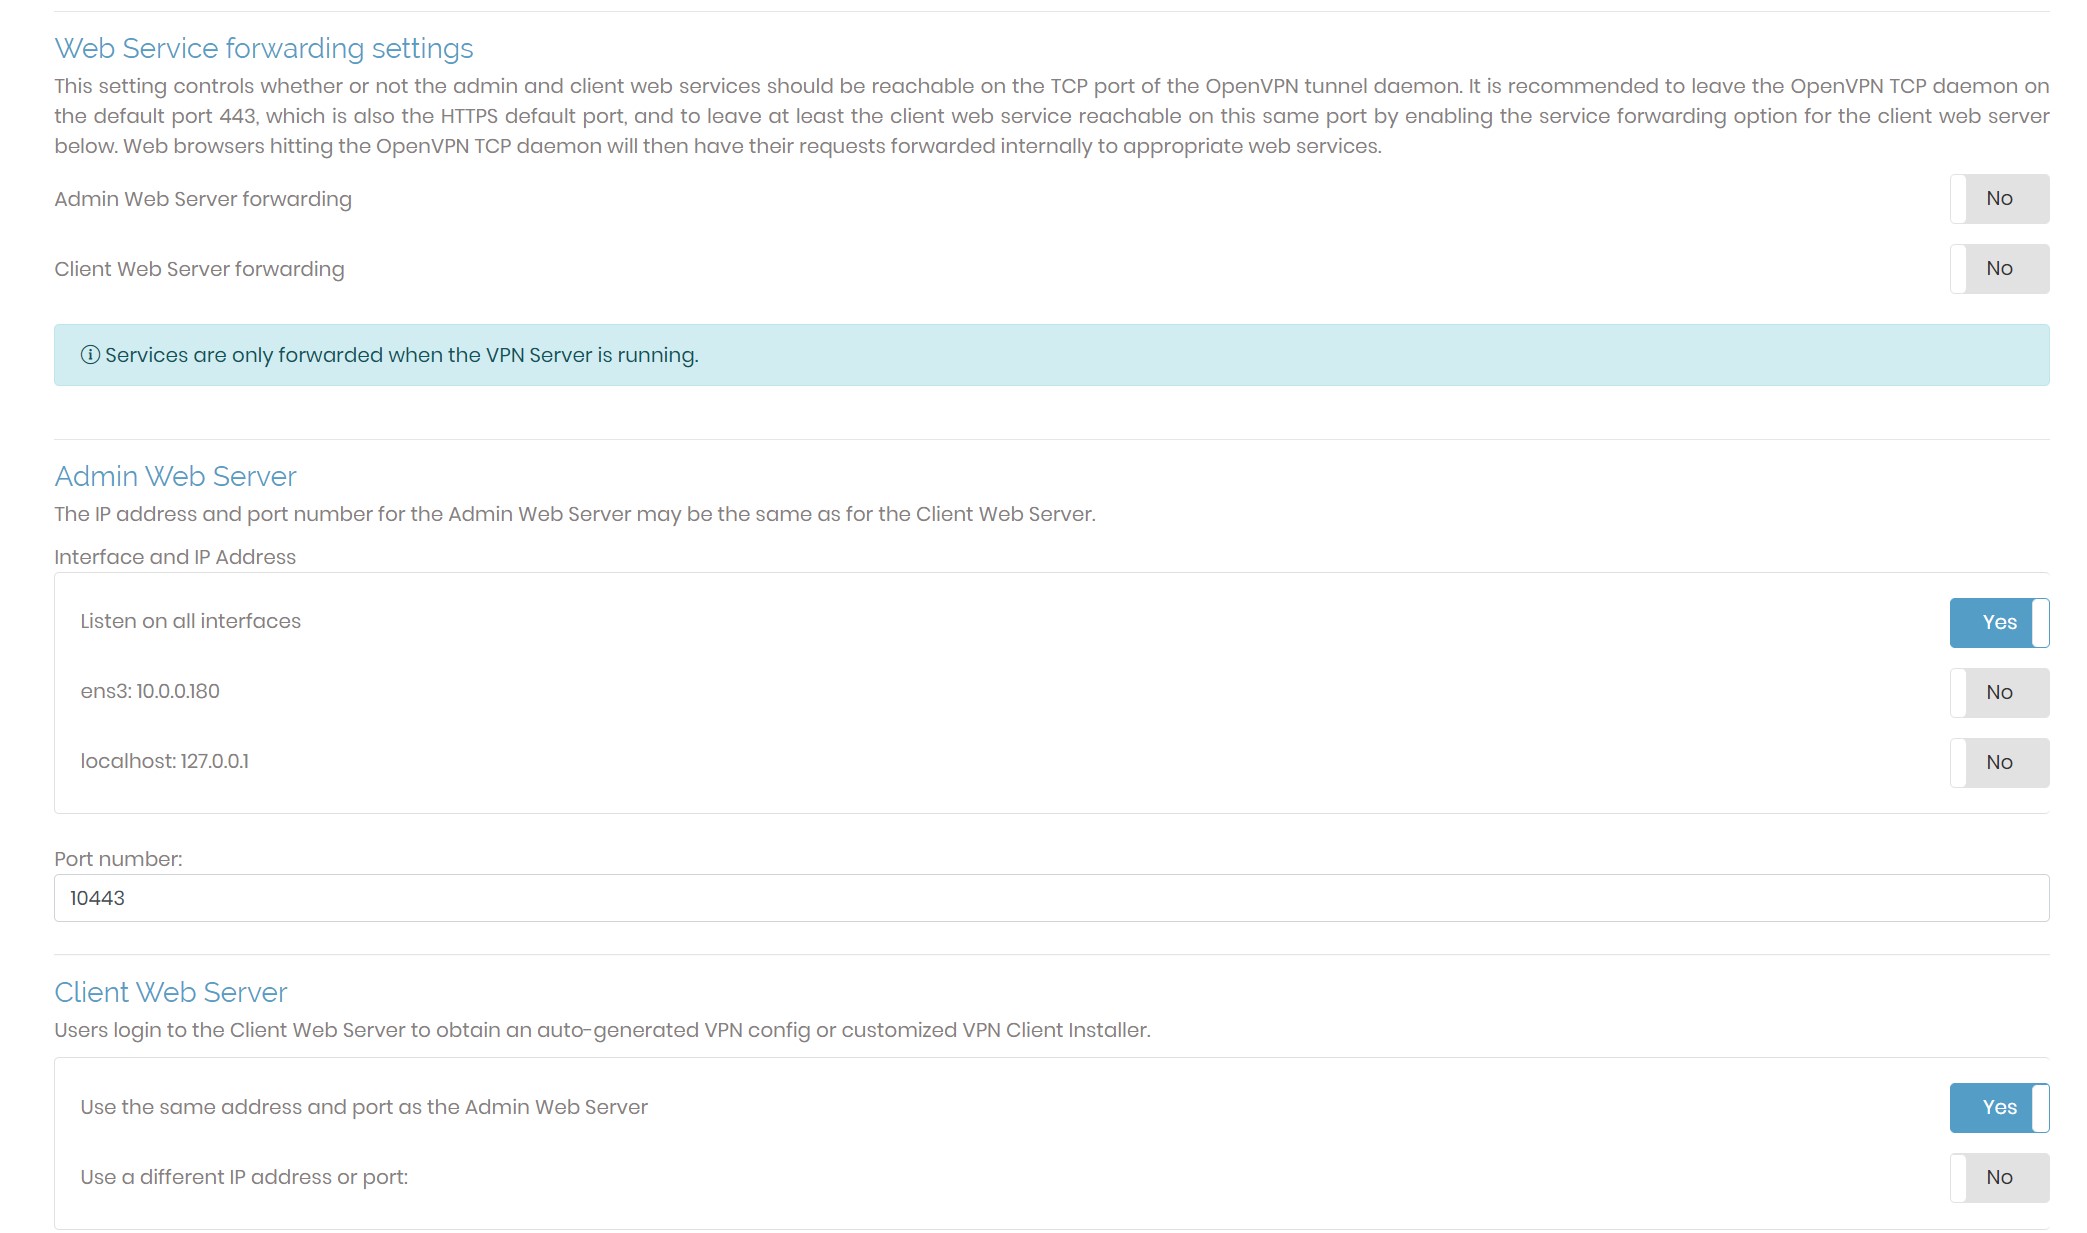
Bear in mind that this method does a poor job counteracting port scanning techniques. This is more of an added measure that makes it more difficult for someone to accidentally stumble upon your admin login page.
Install Your Own SSL Certificate
You may have noticed upon initial setup that a warning message displays noting how the currently used certificate is invalid. By default, OpenVPN uses a self-signed certificate. For this reason, your browser is questioning the integrity of the certificate itself and distrusts its source. Although a self-signed certificate is enough to encrypt your connection when you access the admin panel and is therefore sufficient for configuration purposes, you can get rid of the popup entirely by installing a certificate signed by a trusted certificate authority. To do so, there are services out there that allow you to install the requisite documents, such as the CA bundle, private key, and certificate itself to the server. You can manually upload each of those under the “Web Server” settings in the “Configuration” tab. Alternatively, you can use third party software and services such as Let’s Encrypt and Certbot to provide an easy, free means of getting the appropriate certificate. Installing Certbot via SSH on your server will enable to you pull a certificate from Let’s Encrypt and install it automatically on your VPS. Certbot can also be configured to automatically renew your certificate before it expires. As such, this is a widely-recommended method for installing valid certificates to web servers. Check out their websites to get started.
Close Unused Ports
At the cost of convenience, you can opt for closing any unused ports or deleting unnecessary firewall rules, that is, once you finished configuring the server. With your Oracle Cloud account, you can always add those rules back later. Simply repeat the same steps as before. I would advise you to keep ports 443 and 1194 open as both of these are crucial for acquiring a connection to your server’s VPN daemon. Ports 22 and 943 (or whichever port your admin panel is listening on), however, can be safely closed if you do not plan to reconfigure settings anytime soon. Following this tip will prevent the likelihood of someone trying to connect to your server, or exploiting a vulnerability should one be present.
Keep Your Server Updated
The final tip I can give is to always keep your server updated. Malicious users thrive on exploits that can render your server vulnerable to attacks. Therefore, ensure that you run these OpenVPN updates as often as possible via SSH. A simple sudo apt-get update && sudo apt-get upgrade command can go a long way to ensure your server’s software is regularly up-to-date.
Conclusion:
If you managed to get your server up and running without a hitch, awesome job! If you are having difficulties, you can always comment below or send me a message from the home page. There are also docs that OpenVPN has published on their website, and other videos/content out there that can aid you in your troubleshooting.
Thank you all for reading, my fellow tech enthusiasts!


No responses yet